How to Take Sharp Images
There are several factors that influence how sharp your images are taken with a DSLR camera. While shutter speed and aperture settings are the most significant, how close you are to your subject and what lens you choose can also affect a photo's quality.
There are several factors that influence how sharp your images are taken with a DSLR camera. While shutter speed and aperture settings are the most significant, how close you are to your subject and what lens you choose can also affect a photo's quality.

Settings can vary from one camera to another and
under different lighting conditions, so it's a important to go out and
experiment with a new camera and then experiment again if you purchase a new
lens. Take several photos of the same subject while changing your settings. You
can then compare what works best with your camera in different circumstances.
Getting your digital images perfectly sharp is something
that most photographers want – however clean, crisp, sharp images can be
difficult to achieve.
Perhaps before we start exploring how to improve sharpness
it would be good to talk about the main causes for lack of sharpness:
- Poor
Focus – the most obvious way to get images that are ‘un-sharp’ is
through having them out of focus. This might be a result of focussing upon
the wrong part of the image, being too close to your subject for the
camera to focus, selecting an aperture that generates a very narrow depth
of field or taking an image too quickly without checking it is in focus.
- Subject
Movement - another type of ‘blur’ in shots is the result of your
subject moving – this is generally related to shutter speed being too
slow.
- Camera
Shake – similarly you can get blur if you as the photographer generate
movement while taking the image – this often relates to either shutter
speed and/or the stillness of your camera.
- Noise
– ‘noisy’ shots are ones that are pixelated and look like they have lots
of little dots over them (get up close to your TV and you’ll get the same
impact).

Here’s a list of 10 basic things to think about when shooting to get sharp images (note – there’s also a lot you can do in photoshop after taking you images
1. Hold Your Camera Well
A lot of blur in the photos that I see is a direct result of
camera shake (the movement of your camera for that split second when your
shutter is open). While the best way to tackle camera shake is to use a Tripod
(see below) there are many times when using one is impractical and you’ll need
to shoot while holding your camera. I’ve written a tutorial previously on how
to hold a digital camera but in brief – use both hands, keep the camera
close to your body, support yourself with a wall, tree or some other solid
object etc.
2. Tripods
Regular readers of this site will have seen my recent series
on tripods and know that I’m a big fan of them as a way to reduce (and even
eliminate) camera shake. While not always practical, the result you’ll get when
you do go to the effort of hauling one around can be well worth it.
3. Shutter Speed
Perhaps one of the first things to think about in your quest
for sharp images is the shutter speed that you select. Obviously – the faster
your shutter speed the less impact camera shake will have and the more you’ll
freeze any movement in your shots. As a result you reduce the likelihood of two
of the main types of blur in one go (subject movement and camera movement).
Remember the ‘rule’ for handheld shutter speeds:
Choose a shutter speed with a denominator that is larger than the focal length of the lens.
So:
- if you have a lens that is 50mm in length don’t shoot any slower than 1/60th of a second
- if you have a lens with a 100mm focal length shoot at 1/125th of a second or faster
- if you are shooting with a lens of 200mm shoot at 1/250th of a second or faster
Keep in mind that the faster your shutter speed is the
larger you’ll need to make your Aperture to compensate – this will mean you
have a smaller depth of field which makes focussing more of a challenge

4. Aperture
Aperture impacts the depth of field (the zone that is in
focus) in your images. Decreasing your aperture (increasing the number – say up
to f/20) will increase the depth of field meaning that the zone that is in
focus will include both close and distant objects. Do the opposite (for example
moving to f/4) and the foreground and background of your images will be more
out of focus and you’ll need to be more exact with what you focus your camera
upon. Keep in mind that the smaller your aperture the longer your shutter speed
will need to be – which of course makes moving subjects more difficult to keep
sharp
5. ISO
The third element of the exposure triangle is ISO which has
a direct impact upon the noisiness of your shots. Choose a larger ISO and
you’ll be able to use faster shutter speed and smaller aperture (which as we’ve
seen help with sharpness) but you’ll suffer by increasing the noise of your
shots. Depending upon your camera (and how large you want to enlarge your
images) you can probably get away with using ISO of up to 400 (or even 800 on
some cameras) without too much noise but for pin sharp images keep it as low as
possible).
6. Image Stabilisation
Many cameras and lenses are now being released with
different forms of image stabilisation (IS) which won’t eliminate camera shake
– but can definitely help reduce its impact. I find that using IS lenses that
it will give me an extra two or three stops (ie I can use slower shutter speeds
but 2-3 stops) when hand holding my camera. Keep in mind that IS helps with
camera movement but not subject movement as it allows you to use slower shutter
speeds (not good for moving subjects).

7. Focus
Perhaps the most obvious technique to work on when aiming
for sharp lenses is focussing. Most of us use ‘Auto Focussing’ with our cameras
but don’t assume that the camera will always get it right. Always visually
check what part of the image is in focus before hitting the shutter and if it’s
not right try again or switch to manual focus mode. This is particularly
important if you’re shooting with a large aperture (small depth of field) where
even being slightly out can result in your subject being noticeably out of
focus.
8. Good lenses
This one is for DSLR owners – if you have the budget for it
invest in good quality lenses as they can have a major impact upon the
sharpness of your images. For example shortly after buying my DSLR I was in the
market for a everyday zoom lens that would give me the ability to have both
wide (ish) and telephoto zoom capabilities. I bought a Canon
EF 28-135mm lens. It was a good lens (and reasonably priced) but it wasn’t
as sharp as some of my other lenses.
A few months later I borrowed a Canon
EF 24-105mm ‘L series’ (the professional series of lenses from Canon) lens
from a friend and was amazed by the difference in sharpness between the lenses.
While the first lens was good for what I paid for it I ended up going for an upgrade
and the new lens is now almost permanently attached to my camera.
9. Get your Eyes Checked
Since I was young I’ve worn glasses but in recent years I’ve
been a little slack in getting my eyes checked. Recently I got them tested for
the first time in a number of years and was surprised to find that they’d
deteriorated significantly. Getting new glasses improved a number of areas of
my life, one of which was my photography. Also connected with this is checking
the ‘diopter’ on your camera (if it has one. The diopter is a little adjustment
that you can make to how your viewfinder works – it’s particularly useful for
people with poor eye sight – it’s usually a little wheel next to your
viewfinder.

10. Clean equipment
Recently my wife and I went on a window cleaning frenzy at
our place. Over the previous months the grime on our windows had gradually
built up without us really noticing it. When we did clean them though we were
amazed at how much more light got through and how much better the view outside
was. The same can be true for your camera’s lens. Keep it clean and you’ll
eliminate the smudges, dust and grime that can impact your shots. Similarly – a
clean image sensor is a wonderful thing if you have a DSLR as getting dust on
it can produce noticeable blotches in your end images.
Update
11. Lens Sweet Spot
Lenses have spots in their aperture ranges that are sharper
than others. In many cases this ‘sweet spot’ is one or two stops from the
maximum aperture. So instead of shooting with your lens wide open (ie where the
numbers are smallest) pull it back a stop or two and you might find you get a
little more clarity in your shots.
5 Tips for Getting Sharper Images
An important element of photography is getting sharp, crisp
images. You may be struggling with focus, especially if you are fairly new to
DSLR photography. It is extremely frustrating to go out shooting, assuming
you’ve got nice clear, sharp images, only to get home to find out they aren’t
quite as sharp, or even in focus, as you had hoped.
There are several things you can do to improve your chances
of getting sharper images. Here are a few to get you started, if you have other
tips please share them in the comments below.
Five steps for achieving sharp images
#1 Pick the focus point manually

On
most SLRs, and some of the mirrorless or four thirds cameras, there is an option
of selecting what point it uses to focus. Meaning, when you look through the
camera and see some flashing dots or squares (or something similar to the image
on the right), those are your focus zones or spots. Make sure it is NOT set for
the camera selecting which of those spots are targeted for focusing. When the
camera chooses where to focus it can often pick the wrong thing. If you have a
subject that is behind something in the foreground the camera will usually pick
the closest object, which is not your intention, and you’ll end up with the
wrong thing in focus.
Find the setting that allows you to adjust which target
focus zone the camera uses to focus. Depending on the camera make and model,
that can usually be adjusted with a dial or joy stick on the back of the
camera, while you are looking through the view finder. This frees you to choose
the most appropriate zone or spot for your subject or scene.
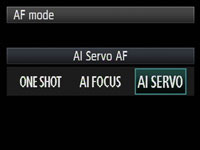
#2 Select the right focus mode


Most
cameras have a few different types of focus modes. On Canon you’ll see them as
Single (One Shot), AI (stands for Artificial Intelligence) Focus and AI Servo.
On Nikon the modes are AF-S, AF-C and AF-A. Choose the one that bests
fits for the subject you’re photographing.
Single (or AF-S) means that the camera will focus and lock
on a single object and will not refocus until you release your finger from the
shutter button.
AI Servo (AF-C) is for continuous focusing when you have a moving subject. In this mode when you depress the shutter button half way, the camera will continue to focus on the subject as it moves away or towards you. It does not lock focus until you press the button down fully and take the photo. In AI Focus (AF-C) the camera will choose between the previous two based on whether the subject is moving or not.
AI Servo (AF-C) is for continuous focusing when you have a moving subject. In this mode when you depress the shutter button half way, the camera will continue to focus on the subject as it moves away or towards you. It does not lock focus until you press the button down fully and take the photo. In AI Focus (AF-C) the camera will choose between the previous two based on whether the subject is moving or not.
#3 Set your minimum shutter speed accordingly

There
is much debate about this subject in terms of how slow is too slow for hand
holding your camera. Some instructors will say 1/60th of a second, I tend to
use another rule of thumb which is 1 over the focal length of your lens. So if
you are shooting with a 200mm lens, then 1/200 is how fast you need to be
shooting to get rid of blur caused by camera shake. The longer lens you select,
the more amplified any movement will become. If you are shooting with a cropped
sensor camera, remember that 200mm is now acting like a 350mm so that changes
your minimum shutter speed to 1/400.
If you use a lens that has image
stabilization then you can often stretch it a little bit more, say one or two
stops, depending on how steady your hands are. You also want to make sure you
are holding your camera in the most stable position with your left hand UNDER
the body and lens (sort of cupping it) and both elbows in tight to your body.
Then, hold your breath and shoot!
#4 Make use of back button focusing
Another much debated topic is whether or not to use the back
button focusing option now available on most DSLRs. I’m not here to get into
that debate, if you want to know more about it you can read 3 Reasons Why
You Should Switch to Back Button Focus by James Brandon. The basic idea is
that instead of using your shutter button to focus, you separate the focus
function to a button on the back of the camera, that you press with your thumb.

Taken using back-button focus
I use it for many things including; portraits where I want
the subjects off centre and don’t want to do “focus, lock, recompose” for every
frame, any time I want to focus on a moving target (you have a better chance of
getting it sharp this way than with the shutter button focus), for HDR
photography when I’m bracketing and don’t want the focus to shift accidentally
between shots, for night photography when I focus with the assistance of a
flashlight and don’t want it to move afterwards (other option is switch to
manual focus every time but it’s too easy to forget to focus at all then).
It does take a little getting use to, but after a friend of
mine that shoots sports for the local newspaper showed me how to use it
properly I never looked back. So when she says it’s better for action focus on
critical, fast moving subjects, I listen cause she knows what she’s talking
about!
#5 Use a tripod and remote trigger or release
Tri-pod = three legs. Three is better than two right? In
some the case of photography – yes! The tripod is your friend.


I think you know what they are and what they’re for, but not
many photographers own one or use it. Placing your camera on a tripod will help
you get sharper images, if you’re doing it right. Get a good sturdy one, don’t
cheap out on a $49 tripod on sale at the big box store and put your $2000 SLR
on it. Do you put cheap tires on your high end sports car – I think not! A
flimsy tripod won’t do you any good if it can’t hold the weight of your camera
and is constantly slipping or loosening.
Worse case scenario has your whole rig
crashing to the ground, not good. Invest in a good one, do some research, make
sure it is made for still photos not video, and it can hold the weight of your
camera. A lightweight one made of carbon fibre is a good option, but expect to
pay more for that option.
In addition to a tripod I also suggest getting a remove
trigger or shutter release. They come in a few varieties including ones that
attach directly to the camera, wireless ones, and even fancy programmable ones
for doing timed exposures and auto exposure brackets. Like anything, the more
fancy shmancy features you want, the more $$$ you will pay. But do get one,
because it allows you to fire the camera without touching it, thus reducing any
possible vibrations during the exposure. I also tell my students to turn of the
IS (or VR) on their lens once the camera is on tripod. This is because the
IS/VR runs a little motor inside the lens that vibrates it to help compensate
for camera shake.

On tripod you do NOT want your lens vibrating, even a tiny
bit. The camera manufacturers would like us to believe that their cameras are
smart enough to know when that’s happened and turn off the IS automatically.
Maybe they are. Maybe they aren’t. I like to take no chances, so I just turn it
off.
Me playing with a view camera at a mock western town in AZ.
The guy posing as the photographer let me have a look through it, for old times
sake.
When I started photography school (technical college) the
first camera they allowed us to use was a 4×5″ view camera. If you’ve ever seen
one you’ll know it’s not possible to use it without a tripod. In hindsight,
some 25 years later, I think those photo school instructors were actually
pretty smart! At the time I just thought they wanted us to suffer hauling all
this heavy gear around. By putting the camera on a tripod you will instantly
slow down and put more time into setting up your shot.

With the advent of
digital and the popularity of SLRs and now even micro four thirds and
mirror-less cameras, it’s become so easy to just grab the camera and fire off a
few images. So besides the obvious benefit of stabilizing your camera so you
can shoot at slower shutter speeds then we discussed in #3 above (if you want
to do night photography it’s essential), using a tripod also forces you to put
a little more time and effort into it. I find when that happens it often
results in a better image aesthetically as well as technically.
Well this was a longer tip than I expected to write, whew!
To sum up, if you are having trouble with blurry images, try these tips
out for yourself. I’m pretty sure you’ll have a bit more success.
10 Tips for Sharper Photos (Even when zoomed in)
Tips for Sharper Photos.
#9 was the most helpful for me. I
never thought about that before.
Daily readers of this site already know how I feel about
sharpness. Sharpness is vital to
professional photographers who make large prints, but beginners probably will
not notice much of a difference between a razor-sharp photo that they view on a
computer screen compared to a fairly-sharp photo that they view on a computer
screen. Nonetheless, photographers are
crazy about sharpness, and I am too.

Sharpness Tip #1: Shoot like a sharp-shooter
Anyone who has ever shot a gun or bow and arrow knows that
the key to shooting well is finding a firm shooting foundation. Shooters do this by stabilizing themselves
against a bench, using a monopod, or standing in the most stable
positions. Not surprisingly,
photographers should use the same advice.
If you haven’t taken a minute to consider whether your photography
posture is solid, think about it for a minute and decide how to improve your
stability. If you don’t regularly use a
tripod, just do it!
Sharpness Tip #2: Don’t zoom to the extremes
I have never tested a lens that is sharpest at the extremes
of the zoom range. For example, if you
shoot a 75-300mm lens, you will get sharper photos at 280mm than 300mm. The Nikon 70-200mm lens shoots sharpest at
135mm. I’m sure there are exceptions to
this rule, but I haven’t seen them personally.
Almost all lenses are sharper somewhere between the extremes of the zoom
range.
This is especially important if you are shooting a less
expensive zoom lens or a kit lens. Spend
just a minute and take a picture of a newspaper taped to the wall across from
you at different focal lengths and apertures.
You’re likely to find quite a variation in sharpness levels depending on
the focal length.

Sharpness Tip #3: Determine your sharpest apertures
Just as the zoom dramatically impacts sharpness, so to does
the aperture.
Many photographers learn that the sharpest aperture on many
lenses is f/7.1 or f/8, but it totally depends on the lens. That is a good general rule, but it is
foolish to accept this as 100% true.
Just take a minute to lock your lens on a tripod and shoot a subject at
all of your aperture levels to see what photo is sharpest. If you are a landscape photographer, you will
likely notice that many wide-angle lenses are significantly sharper at slightly
higher apertures, because they are made that way. This test will only take you 5 minutes to
perform and will improve your photos for the life of the lens.
To test sharpness, make sure to shoot from a distance that
you commonly shoot that lens, shoot in lighting conditions similar to what you
will shoot in the field, and do common-sense things like shoot on a tripod with
a cable release and mirror lock-up.

Sharpness Tip #4: Do Your Output Sharpening Last
Unfortunately, many photographers use the sharpness slider
in Camera Raw or Lightroom first thing. I strongly discourage this technique
because sharpening should match the medium, or be applied selectively.
Photos should be sharpened differently for the use on the
web as they are for print. For example,
when saving a photo that will be displayed on a computer (like posting a photo
to Facebook, for instance), less sharpening is needed because a screen is a
sharp output medium. When saving a photo
for matte paper, more sharpening should be applied than when printing on glossy
paper because the matte paper soaks the ink more than the glossy does.
Also, a photo that will be seen small should be sharpened
differently than photos that will be seen large. It just doesn’t make sense to sharpen before
finishing the editing process. This way,
you’ll be able to go back and re-sharpen the photo in a different way when you
want to use that photo for a new purpose without needing to re-do all of the
other edits done in Photoshop.
Sharpness Tip #5: Stop mashing your shutter button
In my photography workshops, I see many photographers smash
their shutter button with more force than they would smash a cockroach. Mashing the shutter button will torque the
camera at the critical moment when the photo is recording the scene. The proper way to press a shutter button is
to simply roll your finger back across the button.
Sharpness Tip #6: Pick up the manual for your LENS

The lens manual will tell you whether or not to use image stabilization (vibration reduction for us Nikon folks) when the camera is on a tripod. Some lenses should have vibration reduction ON when using a tripod, and other lenses should have image stabilization turned off when on a tripod.
Lenses made in the last couple of years will make this
switch for you, but you’d probably be surprised by looking at the manual for
your lens to find that many lenses that you think may be turning this off for
you… are not. The only way to know is to
check the lens manual.
Sharpness Tip #7: Decrease Your ISO
Photographers know that increasing your ISO increases the
noise in the photo, but their knowledge usually stops there. Did you also realize that increasing the ISO
also dramatically reduces the visible detail in the photo? When I say “dramatically,” I mean
dramatically!
When you’re in a situation where you have to increase your
ISO beyond where you’re comfortable, consider adding flash or moving to an area
with better lighting to produce a sharper shot.
Sharpness Tip #8: Test different copies of a lens
When lenses are created, they are made to certain
tolerances. Especially in the case of
lower-end lenses, the tolerances are not precise and allow for size
variances. For this reason, one lens may
shoot better on one camera than another.
Make sure the lens is working well for your camera. If it isn’t, you might consider returning the
lens and buying another copy of the exact same lens model and see if it works
better.

Sharpness Tip #9: Know Your Focus
I’ve given portfolio reviews to THOUSANDS of photographers
in my online photography classes just in the last year. THOUSANDS!
When they ask me about the sharpness of their photos and how they can
improve, the problem is imprecise focus at least 95% of the time.
So here’s my recipe for proper focus every time…
#1. Decide if you are shooting an action photo or a photo
with a stationary subject. If you’re
shooting a moving subject, choose continuous focus (AI servo on Canon or AF-C
on Nikon). If you’re shooting a
stationary subject like a landscape or a person standing mostly still, choose
AF-S on a Nikon or Single Servo on a Canon.
#2. Always choose the focus point yourself. Don’t let the camera decide. Get used to moving the focus point with the
four-way selector on the back of your camera.
If you’re shooting a portrait, ALWAYS place the focus on the eye of the
person closest to the camera. On the
nose or face or body of the person is not good enough. Always focus on the eye. If you’re shooting a landscape, generally
focus one-third up from the bottom of the frame, but if you have a strong
foreground element, you may want to focus closer.
#3. Once you’ve focused, be extremely careful not to sway
forward or backward at all. When
shooting with a fast lens at a wide f-stop, even a slight movement will move the
focus before the shot.
#4. Be sure not to focus too close to the lens. Each lens has a close focus distance, and the
camera manufacturers like to push the envelope with this distance. I usually find that if I focus right at the
closest point where the lens will still focus, the result is a blurry
shot. Back up a little bit from the
closest you can be to the subject and you’ll always improve the result.

Sharpness Tip #10: Upgrade your shutter button
Less expensive cameras come with either a metal or plastic
shutter button. It does the job just
fine, but it encourages the poor habit of “clicking” or “mashing” the shutter
button. More expensive cameras like the
5D Mark III, Nikon D810, etc, have squishy shutter buttons with a rubber
coating on top so that the press of the button does not vibrate the camera as
much.
For only a few dollars, you can pick up a rubber pad to fit
over your shutter button which will solve this problem and upgrade your shutter
button for you.
It can be tough to tell how sharp a shot is when looking at
the back of the camera. Zoom in all the way on the eye and the difference is
easy to see.
It can be tough to tell how sharp a shot is when looking at
the back of the camera. Zoom in all the way on the eye and the difference is easy
to see.
Bonus Tip: Zoom to the Eyes!
The best way to know if you have a sharp photo while
shooting is to zoom in on a picture you’ve just taken all the way to 100%. Zoom in on the eyes and see if you can see
the eyelashes. If the eyelashes are just
a clump of black, the photo is not sharp.
If you can see each hair in the eyelash, you have a sharp shot.

11 Tips On How To Get Razor-Sharp Photographs
Sharpness in the photographs tends to elude even the most
seasoned photographers. That’s because sharpness is a perception; and that it
is affected by many factors adds to the confusion. Also, note that sharpness
and focus are different entities — an image can be in focus yet not sharp.
Sharpness is controlled by many factors and at many stages of the photography
work-flow.
Basically it’s a product of the following:
Basically it’s a product of the following:
- Equipment
- Settings
- Technique
- Post-Production
Thus here are some tips to get sharp images.


- Quality
Of Lens: The quality of the lens can be the most defining factor for
sharpness. Though in this age almost all D/SLR lenses have excellent
optics, some of the lenses manufactured by third-parties may not be have
such good optical characteristics. The lens characteristics can introduce
color fringing, linear distortion, coma, spherical aberration, falloff,
and an endless list of scary photo-jargon. Also prime (fixed focal length)
lenses tend to be better than general purpose zoom lenses which pose
engineering challenges for the manufacturers.
- Camera
Quality: Cameras of the same grade don’t have a huge difference in
image quality. But when you consider the differences between a compact,
prosumer, DSLR and a full-format, the sharpness “and” the image-quality
with be considerably different.
- Poor
Filters: Filters often tend to be the bottleneck as far as optics are
concerned. A cheap filter fitted over costly optics can be as destructive
as a cheap camera, a cheap lens or a combination of both. Invest in high
quality filters.
- Clean
Optics: And while we are talking about lenses and filters, make sure
that you have a handy kit to clean the front most glass/filter as and when
you require. Here’s a short tutorial on lens
cleaning tips and tools.
- Small
Aperture: The sharpness characteristics of every lens varies by the
aperture and generally deprecates at both extremes. While you can do some
experiments and tests to figure the sharpness at both ends, generally
every good lens has acceptable sharpness through out it’s aperture. Very
small apertures, introduce chromatic aberration which kills the sharpness
in the picture.
- Proper
Focus: If the scene itself is not in focus, it will result in a blurry
image no matter how good the optics are. So make sure that the scene is
focus when you shoot. Also moving subjects can trick the camera to focus on
unwanted points in the frame. So make sure you have continuous auto-focus
turned on for moving subjects.

- ISO:
Shooting on high ISOs can introduce color noise in the result which even
through post-processing doesn’t allow the recovery of sharpness. Details
in a scene are resolved through the optics and the sensor but are lost due
to the noise introduced by high ISO levels.
- Camera
Shake: Camera shake introduces motion blur even on properly focused
subjects. And it tends to get worse as the focal length increases — the
zoom levels amplify the camera shake too.
A good vibration reduction (image stabilization) can take care of this in general conditions. - Mirror Lockup: Mirror Lockup feature lifts up the mirror (present in front of the camera sensor) a fraction of a second before the exposure is to be made. This eliminates motion blur occurring due to the shake caused by the mirror movement.
- Tripod: When on shaky grounds, place the camera on a tripod. This comes in very handy for shots that require slow shutter-speed. Tripod is the most effective equipment to reduce motion-blur.
- Remote
Trigger: Alternatively, in the absence of a tripod place the camera
on a stable surface and use a timer or remote trigger to take the shot.
- Shutter
Speed: A high shutter speed freezes motion. Also shooting at high
shutter-speed takes care of the camera shake. So employ this technique to
cover up for motion artifacts.

- Capture
Sharpness (in camera): The period when the camera makes and exposure
and collects the image data to the sensor and saves it on to the memory is
roughly referred to as the capture phase. Almost all digital cameras are
bugged by Bayer
Interpolation which kills sharpness. Shooting film is one workaround;
some DSLRs featuring Fevon sensors don’t rely on Bayer Interpolation to
resolve the image. During the capture phase, the image is captured in
three distinct color components viz. red, green and blue.
The Bayer filter (the one built into the digital cameras) does this by collecting these three color components at three different physical points whereas the Faevon sensor does this by collecting these color components in three different step albeit from the same physical point.To cut the long story short, shooting RAW avoids interpolation until the image is opened using the RAW software.
This allows finer control over sharpness (and maybe improved algorithms depending on the software version). When shooting JPG, this is done in camera, and thus if your sharpness setting is low, details lost can never be recovered but only simulated.
- Post Processing: Now that all has been accounted for, and you zoom the image to 100% only to find it still unsharp, don’t lose heart. All images require some final touches including some sharpness adjustments. Also referred to as output sharpening, this relies on applying some finishing touches to boost or enhance the sharpness effect. All those sharp images you see in the magazines and adverts elsewhere are post-processes almost always. So, launch your image-editor and fine-tune the sharpness to your liking, keeping in mind to avoid over-sharpening.
Bonus: Reduce the size of the image to 50% or 25%. This will
boot the sharpness (effect) and the size is perfectly usable for almost all
purposes. Use the “Bicubic Sharper” algorithm when reducing size.
To conclude:
I want you to understand why an image might not be as sharp
as you’d like and how to remedy this:
- Avoid camera shake by supporting your camera properly. Shoot at a shutter speed at least equal to your focal length and use image stabilisation if you have it.
- Control subject movement by selecting an appropriate shutter speed. Remember, you need higher numbers to freeze faster action.
- Select your AF point yourself and don’t focus/recompose. Use continuous focusing modes if your camera is capable.
- Be aware of your depth of field. Choose a suitable aperture for your situation.
There are many times where sharpness will not be the main
factor in the success or failure of an image, but you still need to have a
basic understanding of why an image can become blurry so that YOU are in
control of when and where the blur appears.
Travel photography can often place you in situations you
aren’t ready for, but you always have to have sharpness at the forefront when
you get your camera out so you don’t return home only to find your photos
unusable.
The best composition in the world or the most beautiful
light you’ve ever seen will be meaningless if your final image is out of focus
or has some unexpected blur in it. The only solution to this is to
understand and keep practicing these techniques until they become second
nature.
Have a good sharp day ! Just do it
Have a good sharp day ! Just do it
No comments:
Post a Comment